Outline the quintessential content about the Earth Battery. Several versions and theories serve the design of the Earth Battery.
Main content for Earth Battery Design:
- Experiment #1 How to assemble a 12 vdc system
- Experiment #2 How to assemble a 12 vdc system
- ADVANTAGES OF EARTH POWERED BATTERIES
- Experiment #3 How to assemble a 12 vdc system
- Experiment #4 How to assemble a 12 vdc system
- HOW TO GET AC CURRENT FOR HOUSE HOLD USE.
- MORE ON THE BASIC PIPE METHOD
- WHAT IS ETHER OR RADIANT ENERGY?
- A VERY STRANGE AND NEW DISCOVERY!
- OUR MORE ADVANCED EARTH CAPACITOR! ( EECC) EARTH ENERGY COIL CAPACITOR!
- ROLLED EARTH CAPACITOR
- CONNECTING THE CELLS IN SERIES
- EECC UPDATE
There are many ways to pick up on the free energy in the earth, Just a few are described in these plans. These devices if made right will pick up earth energy that many call ether or static currents as well as acting as high efficient earth battery’s. Ether travels through plastic wood etc... Study and research these plans closely there is more to these plans than what you may think. You can learn to get enough power to run your home!
Experiment #1 How to assemble a 12 vdc system
1. You will have 12- 4” 3/4” copper piping, or If you did not purchase the kit then cut your copper to this size. KIT: take each piece of copper and tape the tops with 1'' masking tape.
2. Now using RED LACQUER spray paint (Which you can buy at any hardware store), Paint the outside of the copper all around. ( DO NOT PAINT THE INSIDE.) let air dry for 24 hrs. Now remove 1" masking tape.
3. Take the copper pipe outside to the area that you are going to use. use a hammer and hammer each one Into the ground up to the 1" copper exposed top. do not let the exposed copper touch the earth in the final placement. Dirt should be moist. Not real dry.

4. Now remove each pipe and place a thick piece of plastic on bottom of copper pipe to cap it. LET IT BE LOSE,
DO NOT TAPE IT. YOU WANT RAIN WATER TO BE ABLE TO ESCAPE FROM EACH PIPE, Do not let exposed outside copper touch the earth.
5. Now hammer each pipe back Into the same holes. place each 2" piece of zinc rod ( or a long bolt, most bolts are zinc plated ) into the center of each pipe. The zinc Is the NEGATIVE and the copper is the + POSITIVE.
6. Now connect them in series to get 12 volts, use clip wire or solder them. If you are going to leave It outside for a long time then make sure connections are soldered and then painted to protect them from the weather. The rain will replenish your earth batteries. Top get more amaperage with this type simply add more copper and zinc rod cells USE 3' PIECES OF COPPER PIPE INSTEAD OF 4" PIPE. THEN CONNECT EVERY ROW OF 12 PIPES IN PARALLEL..
ADD AS MANY ROWS AS YOU NEED UNTIL YOU GET THE DESIRED AMPERAGE YOU WANT. ( THINK BIG! ) This can be a very powerful free energy system for your home or other. Not only will you get an earth battery effect, but you will also be collecting earth currents from ether /static and under ground radio waves as well.
7. The deeper you go with the copper pipe, the more amperage and voltage you can get.
Related: Telluric Current
Experiment #2 How to assemble a 12 vdc system
This is just an example to go by and is not the best way but is low in efficiency! See our capacitor earth cells, coil type or flat sheet type. They produce far more amperage and voltages than this type.

NOTICE: Do not paint the 10 foot copper cell. Keep all copper exposed to the earth. The more exposed copper the better. For higher amperage output, use a zinc or aluminum rod 10/16” Diameter which will leave a space of more than 1/16” to the copper.
Related: Earth Battery DIY Pipe
ADVANTAGES OF EARTH POWERED BATTERIES
1. Free Energy
2. Long Life
3. The collection of aether energy.
4. Cells are also replenished by outside weather. Rain as well as lightning charges.
You can purchase Zinc rods or zinc plated bolts at any hardware store, most all nuts and bolts they sell are zinc coated and will work just fine. They also carry aluminum sheeting. Most hardware stores can order you copper sheeting as well.
Experiment #3 How to assemble a 12 vdc system
This is a simple way to produce more amperage but is not practical, we are only showing you this to educate you. The closer the zinc rod is to the copper the more amperage you will get as well as going deeper into the earth. If you do decide to build this basic set up. It is suggested that you solder all leads very well and dig deep enough into the earth to hide the tops of each cell. By covering the tops with dirt the cells can short out so what you want to do is to paint the exposed tops with lacquer or enamel paint then cover with plastic, cover with dirt and allow both the negative and the positive leads to stick out of the ground. But like I said this is not practical, what your goal should be is to make a very strong uf earth capacitor / battery, This will allow you to pick up and collect earth radiant waves of energy as well as lighting energy during storms, the energy you can collect in a strong lighting storm will amaze you! You must use an antenna on the zinc rod or copper rod.
WARNING! Be careful when collecting lighting it can kill you, be sure the positive and negative wires are not coming into your home. During a storm it is advised to have the lead wires going into a large uf cap bank via a one way diode on the positive lead to the positive of the cap or battery. The earth battery’s can be dangerous at times and must be completely buried in the earth so a child, adult or animal can not touch or get to. Our earth capacitor batteries can store and hold thousands of volts. So be careful. Use rubber gloves and clothing to protect yourself. We are not responsible for anything in these plans you build at your own risk.

Experiment #4 How to assemble a 12 vdc system

But if you put them 6 feet apart you will get a gain In voltage and they will not cancel one another out. so by doing this you can put them In series to increase your voltage and your volt amps. The theory is that there Is some sort of natural energy VORTEX that takes up about that much space for each unit or cell.

HOW TO GET AC CURRENT FOR HOUSE HOLD USE.
MORE ON THE BASIC PIPE METHOD
Please note: the dirt level inside each pipe should be up to 1/4” from the top. each pipe should be tightly fliied with dirt. Which will automatically happen when you hammer the pipe into the ground the first time.
Each copper pipe (or cell) should be spaced 1 Inch to 1 1/2 inch apart. Doing this will give you more amperage and voltage.
How to dig a simple deep hole for 8' pipe: There are many ways in which you can do this. you can rent a ground drill bit and rig it up with a electric 2 hp motor or you can use 1” copper pipe.
First: prepare the ground with water to make it moist but not muddy, 2nd: hammer a 1” x 5' copper pipe into the moist ground about 5 inches deep/ then remove it from the ground and take a stick or a water hose to remove the dirt from inside the pipe.
Then just repeat the process over and over until you get the desired depth that you want. you can get about 10 feet or more using this method.
WARNINGI BE CAREFUL OF ELECTIC POWER LINES WHEN YOU PLACE OR PULL THE COPPER PIPE FROM THE GROUND, IT WILL KILL YOU IF YOU TOUCH A POWER LINE WITH THE END OF THE COPPER PIPE.
We are dealing with a new type of energy as well as conventional energy < Ether energy can go through rubber/ plastic. Iron, etc....
WHAT IS ETHER OR RADIANT ENERGY?
The understanding comes from a very deep study of etheric or static forces, this energy that we are getting out of the ground is what some call LIGHT ETHER, when you separate the light ether from the warm ether you can get these superconductive events. It appears like electricity but it has no heat events related to It.
The point is that the best polarity's of things to get a differential in the light ether is to have a silvered coloured metal and then something that is totally absorbitive/ Like black Carbon.
So now you have something that's the perfect reflector and something that is the perfect absorber, and once you understand what your pulling out of the ground ( and that it Is not classic electricity as we get out of a normal type of chemical battery), then your going to be farther down the road to understanding how to get much more power out of this stuff.....
There are researchers now that are getting 1 /2 volt to 2 volts dc on a "Quote" volt meter, but it will shock you through an inch of rubber shoes this is not normal electricity!
Q: Is this energy coming from the sun and being absorbed In the earth or from the center of the earth?
A: Yes, but the primary source of light ether is the sun light, yes the earth does have an economy of light ether which does follow the sun around. BUT IT IS ALSO IN THE GROUND! AND ITS IN THE AIR!
Q: Did NokolaTesla know about this in the 1900's?
A: Yes, if you read into his writings he was always saying things like, there is more energy moving than just the electricity in this stuff.
Example:If you take a large Tesla coil and fire it up, and you drive it with a van de graph generator and you put the output of that into a Tesla coil. you can throw sparks across the room! What these electrostatic machines are gathering is light ether.
A VERY STRANGE AND NEW DISCOVERY!
While working outside on another experiment I discovered a very strange generator effect, much to my surprise, I found that by using 2 aluminum 8” disks connected to my DC volt meter and by placing both disks in a vertical position while touching the bare earth dirt, and moving one of the disks and allowing the other to be stationary I get a dc voltage positive output! This effect works with any size or shape of aluminum, we used 8” diameter disk x 1/8” thick, we found that size to work best. Also by stacking them like a capacitor you will find that the current output is far greater, For Example: see figure 1, Disk A would have 4 more disks connected in parallel of the same size separated by paper die electrics. The same goes for Disk B .
First find a spot any where on the ground where there is no grass ( best when wet ).
Please note, it's not just creating an acid battery effect, you are also getting a good contact with the ground as a conductor to pick up ether energy.
Now place the disks side by side, attach your DC voltmeter probes onto the disks, one negative and one positive. DC meter should be on the lowest setting, now place both disks on the ground very softly and move disk B and do not move disk A (positive.) You will notice you are getting a small amount of voltage and amperage. Now Move disk A and do not move disk B. THE POLARITY CHANGES.
The rule here is; The disk that moves is always positive. since we can get a polarity change just by moving the disks at opposite times. You can make a very simple mechanical device to get AC current from on top of the earth. Again, this is not just a chemical reaction we have done many test to prove this. You can also get a small voltage reading in dry dirt. The reason for the smaller voltage in using dry dirt is because a low conductance resistance is taking place here, keeping the system from being in contact with the earth and collecting the earth eather energy.

This method is far better than using pipes or rods. By using copper and zinc or aluminum foil sheets you will get much more amperage out of your system!
The amperage you will be collecting will be coming from 3 different sources,
- The acid in the ground and water
- Energy that is being transmitted from the earth itself
- Energy that is being transmitted from the sky and space.


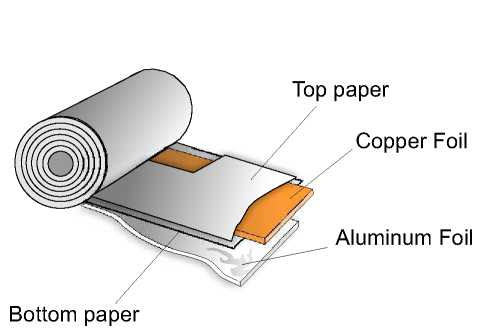
OUR MORE ADVANCED EARTH CAPACITOR! ( EECC) EARTH ENERGY COIL CAPACITOR!


ROLLED EARTH CAPACITOR


Recommend for you - Earth Battery Design: This professor plugged his house to Earth’s core.... totally legal
The Earth’s core is producing 47 trillion Watts of electricity right beneath our feet each and every second. That’s 1 million times more than the mankind can consume.
For various reasons, science couldn’t (or didn’t want) to figure out a way to harvest this immense source of energy up until now....

More Details: Discover how to power his house from earth’s core...totally legal.

You must simply plug a couple of wires into the ground …and not worry about weather conditions for your rest of life
CONNECTING THE CELLS IN SERIES
How to connect the cells in series to increase the output voltage without allowing the cells to cancel each other out. Figure A The Copper pipe and zinc rod method without the use of plastic on bottom of pipe. Figure B is the coil earth cap method.

Use electrolytic capacitors to store the charge coming from each cell, then connect them in series using Commutator Sw’s connected to a small rotor shaft, connected to a milliamp solar cell hobby motor or build a small fuelless engine electric motor to run on and off switch’s. You can also build a very low milliamp electronic switching circuit and use the earth energy to power it. Or another more simple way would be to use a hand spring type device ( timer type ) glue small magnets on a long rotating rotor arm connected to the inner spring. Then place small reed relay magnetic switches, on each timing magnet On position. should have multi reed sw’s, as the unit turns if gives time for the caps to charge and then comes around and connects caps all in series which in turn discharges into main cap dump.

EECC UPDATE
These are just a few extra idea’s that we threw together. I hope they are helpful to you.
Let us know how you like these plans. Send us photo’s of what you have done we love to hear from our customers. If you got any new free energy idea’s let us know we can research them for you. Many customers do not have the extra research time that we have.

No comments:
Post a Comment